Tuesday 28 February 2012

Dotting tool set

Hi All!

Front of the card

Back of the card
Dotting tool
3  nail polishes, 4ml each

Discription in the card

Discription of the card
This dotting tool set which consist of a two end dotting tool and three bottles of nail polish. I bought this from Watsons last december for about sgd 14 ( based on my impression). Well, if you would like to purchase the dotting tool only, G-market do sell too. Dotting tool can be used to create different designs apart from creating dots on the nail. I do some tutorials using it in the future =)

Thank you for reading!~


Tuesday 21 February 2012

17 Magnetized nail polish

Hi All!

Blue (left), Green (right)

top view of the nail polish bottle

Magnet strip on top of the cap


One coat of green magnetized nail polish
Two coats of green magnetized nail polish, finished with Seche Vite top coat

one coat of blue magnetized nail polish

two coats of blue magnetized nail polish with seche vite nail polish


This is a pretty cool nail product that I have used so far. It's a brand called 17 by Boots and available there. I first got to know this product when The Saturdays, a UK girl group, produced magnetized nail polish sold at Superdrug. Well I never purchased it because it is rather pricy, at 7 pounds for a bottle of nail polish and about 3 pounds for a magnetic strip which is to be purchased seperately. 17 magnetized nail polish is some what like a cheaper subsitute for the other product.

I usually have a habit to apply at least 2 coats of nail polish so that it will look consistantly opaque. After applying the second coat of nail polish, place the magnetic strip above your nail resting the plastic piece protruding from the cap near your cuticle. Next tilt the cap from left to right so that it will evenly spread out the magnetic particles on the nail. The particles are able to "move" when the polish is wet, otherwise will just look like a regular nail polish.

I first tried out the blue coloured nail polish and was not impressed by it because the contrast between dark blue and medium blue is not obvious. A big problem that I faced was preventing the magnetic strip from touching my wet nail polish because it has to be placed really close to the nail. However, after getting the hang of it, it is not that difficult. The green coloured one looks the best because the pattern is pretty obvious.

Sorry for the "not so good looking" pictures, I couldnt find the right lighting to take pictures so I only took pictures at spots where it looks "true to image", if you can get what I mean.

Thank you for reading!

Disclamier: I am neither paid to review this product nor helping the company to advertise their product.

Thursday 16 February 2012

SASA Lash Curler

Hi All!


Close up view of the curler

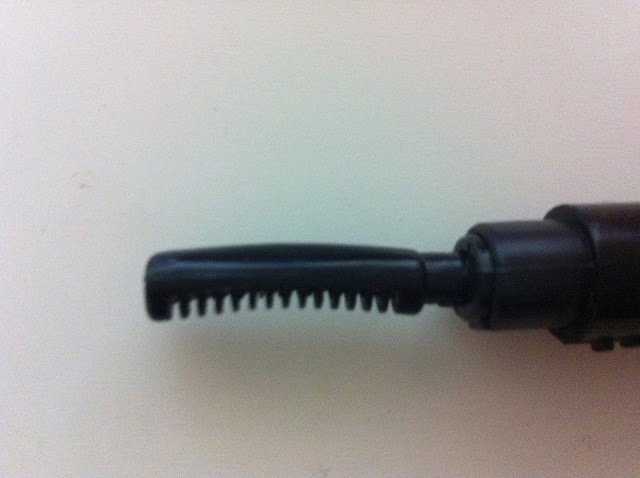
Sideview of the curler
Using heated lash curler has made curling lashes so much easier than the regular lash curler. I used to have quite a few major issues using normal lash curler. It usually takes me a super long time trying to curl my lashes as it is stubbonly straight, my lashes may bend 90 degrees if I do not curl them well, lastly my lashes getting stuck to the metal tip when I re-curl my lashes with mascara on, worse of all lashes falling out when you try to do so. After using heated lash curler, I highly doubt I will be using the regular lash curler.

The heat from the curler is not that hot like a hair curler and it will not burn you skin, it does not melt your contact lenses in your eyes (for contact lense wearers). However, due to the heat, if your eyes may feel a little dry when using a heated lash curler, well I suppose that happens because the heat takes away moisture from your eye area. If you are able to curl your lash real quickly, there should not be much problem.

I have been using this for about 2 months and really love them. I will apply 1-3 coats of mascara before curling my lashes with the heated lash curler (takes abt 5 seconds), by doing this your lashes will remained curled for a longer period of time. However, this technique may not work for all mascaras as it depend on the mascara formula. I have tried it with my Bourjois mascara, it will remove most of the mascara on my lashes when I comb it through.

This product is avaliable at SASA retailing about 7-8sgd which is really cheap.The packaging is slim and fairly light and it occupies much less space in the makeup pouch. Some extra informtation if you are interested to purchase this product. The curler uses a AAA battery and the curler does not provide free battery upon purchase. The energy from the battery will drain away quite quickly, depending how long you turn it on and the brand of battery that you use.

Apart from SASA heated lash curler, there are several brands in the market. Even chanel has a limited edition heated lash curler for about 41 pounds which I saw in the magazine. For starters, it would be good to buy a cheaper one and test it out.

Thank you for reading!~


Disclamier: I am neither paid to review this product nor helping the company to advertise their product.

Saturday 11 February 2012

French Manicure

Hi All~!


As promised, I have just done my french manicure and uploaded the pictures below =)

Products that I used
After painting base coat and a peachy nude nail polish

Applied Etude House mini frence polish at the tip of the nails
To mask imperfect white tip, use L.A. colours in silver Glitter above the white tip

Finish it with Seche Vite Fast drying nail polish

Seche Vite fast drying top coat is my favourite top coat ever, it has a nice glossy shine and dries very quickly, great for very impatient person like me.

I may do weekly review of nail polish since I wear nail polish everyday and change it rather often.

Thank you for reading!

Friday 10 February 2012

Nail Art - part1

Hi All!


L.A. Colours - Black

L.A. Colours - Magenta

L.A. Colours - Silver Glitter

L.A. Colours - Gold Glitter
Etude House - Mini French in 01
 These are the few nail art items that I have been using/ bought lately. Amongst all, the first two which I bought and tried was L.A. colours in silver Glitter and Etude House mini french. Etude house mini french is used to paint the white tip on your nails . The bristles are much shorter than the regular nail polish brushes, thus it is very easy to control and apply. I didn't face much problems painting it with my left hand ( I am a right hander btw). The formula is rather thick and pigmented so a coat is only required. A problem with the thick formula is that the nail polish in the bottle will thicken quite quickly, making future applications much stickier and harder to apply. Probably then a bit of nail polish varnish could be added so that it will be less thick.

Since the white tip is not perfectly straight, I will usually use a glitter nail polish to go over the uneven line between the main nail colour and the white tip, this will result in a more perfect looking nails. The glitter nail polish solution for both gold and silver is not thick, little giltter will only be transferred with every stroke of nail polish you apply. About 3 layers of giltter has to be applied for it to be more obvious. The black and Mangenta ones are rather pigmented. Problem with L.A colours art deco polish is that the brush is very long, making it rather difficult to apply, but after a few practices it will turn out fine. Well I am not too sure exactly where is the L.A. colours avaliable in Singapore. I bought the silver one from F21 store for sgd$3, the other three I got them at 1 pound each from one of the shops not too far from where I am staying. The Etude house mini french cost about sgd$5 ( I can't remember exactly). At Etude house, they do have a gold glitter and black version of the mini french polish, probably you could check them out if you're interested to try such stuff.

I will be posting pictures on the french nail design that I had done a few times with these nail art items soon =)

Thank you for reading!~

Disclamier: I am neither paid to review this product nor helping the company to advertise their product.

Wednesday 8 February 2012

NYX - lip smacking fun colours

Hi All!

Swatches: Tea Rose (left), Frappucino (centre), Hermes (right)

I got these lipsticks a few months ago but would still like to do a review on NYX lipsticks. These are the first few NYX products that I have tried and I am pretty impressed by them. The texture of the lipstick is creamy (semi-matt), very pigmented and does not cause your lips to feel dry. My favourite colour is  Frappucino, well Tea rose looks good too but the colour is a fairly bright. Due to misleading swatches on the website I purchased Hermes, not a wearable colour for me. The downside of this product it that the lipstick is not long wearing, you have to touchup rather often. The packaging of this product feel quite plasticky and cheap, but I am fine with that as the product is decently good.

They are really inexpensive, I bought mine from Cherry Culture through Smoochiezz spree and the cost of each was about sgd 6 and they have a massive number of colours which you can choose from.  If you are interested in buying NYX products, I would suggest buying them from a stall which has testers so that you can try them out before purchasing them. The swatches of all the lipstick on most of the online stores are so different from what they are in person. In case if you are planning to buy them from websites, it is good to search NYX lipstick reviews on youtube so that you can get a better look of how the colours look like so that you can make better decisions.

All in all, NYX lipsticks could be a good way to get you started if you are new to lipsticks and want to try it out.

Thank you for reading!


Disclamier: I am neither paid to review this product nor helping the company to advertise their product.

Friday 3 February 2012

Rimmel - Kate Moss collection

Hi All!


Lipstick in number 08

Swatch of lipstick colour 08


Swatches from English Oak palette.


Swatches from Green Park palette
I was attracted to how the eyeshadows were arranged to form jack union which is so cute. I was doubtful when I first purchased them as Rimmel counters here do not have any testers for most of their products and I have never tried rimmel eyeshadows before. The swatches are pretty much true to colour and they are quite pigmented. These two palettes are more suited for achieving daytime look.

There are two problems I faced when using these palettes. Firstly it is very shimmery and I usually do not fancy wearing too much shimmer in my entire eye area, especially to contour the eye socket area I prefer using a matt eye shadow. Secondly, it is very difficult to use your brush (esp when your brush is much bigger than the surface area of the product) to pick up the product from sections at the four corners on the palette, it can be quite irritating at times.

The Rimmel lipstick in 08 is so pretty and wearable that I wear it to school most of the time. It is highly pigmented, does not have a metalic sheen nor glitter particles in it and not too drying on your lips. Since it is a neutral colour it is not very obvious that you're wearing lipstick. I usually dab a bit of lipbalm on top my lips after applying lipstick so that my lips will feel more moisturised over a longer period of time.If you feel that a lipstick colour is too dark or bright after applying, you could blend out the colour using your fingers and apply some lipbalm on your lip after that, this could tone down the lip colour.

Thank you for reading and enjoy your weekend!

Disclamier: I am neither paid to review this product nor helping the company to advertise their product.

Wednesday 1 February 2012

Bourjois- Smile enhancing gloss

Hi All!


Beige Tapis Rogue (left),  Fraise Celebrity (right)
Tooth whitening gel applicator
Swatches: Beige Tapis Rogue (left),  Fraise Celebrity (right)

I am not a huge fan of lip glosses because I have oily skin, so shiny skin and shiny lips is a turn off for me. Since it is still winter, my skin is less oily and my lips will feel dry real easily, thus lip glosses may be a better substitute for lipsticks. I purchased these lipglosses mainly to try out the tooth whitening gel. It is a pretty interesting concept as most duo end lip products consist of a gloss and a lipstick or balm and lipstick.

The lip gloss is very pigmented, it does not feel sticky on the lips, it has mint vanilla scent which is not over powering. There is a little glitter bits in the gloss but it is not obvious when you wear them on your lip or when you swatch them, I guess this may be due to the highly pigmented lip colour.


My initial expectations of the whitening gel is that the formula is has a strong minty smell, taste like toothpaste and will totally not work at all. I am not a fan of minty stuff. In reality after testing it out, it turned out quite differently from what I thought. Yes, there is a minty taste and smell but it is so mild that you can barely feel it. Using the applicator, apply some of the gel on my front teeth, leaving it there for a little while before you "close" your mouth. It will not give you perfect pearly white teeth but it brightens and cause it to look less yellow some how. 

Overall I am impressed with product and I wish they could have more colours in the future.

For more information on this product, visit: http://www.bourjois.co.uk/catalog/make_up/lips/gloss/smile_enhancing_gloss

Thank you for reading!


Disclamier: I am neither paid to review this product nor helping the company to advertise their product.